July 29, 2011

F Bomb

Yep. The F Bomb.

There are times in life when nothing else really fits. I find it helps to say it, and then move on. It is kind of a "there, I feel better now" moment.

When life is throwing lemons your way, toss an F Bomb back and see how it feels. I suggest that you wait until the kids are out of ear shot- but I won't judge.
I'm nice like that.

We have had the need for an F bomb or two in our house these days (and, no, not because we have a house guest ;) and so, I created this little beauty.

Call it a paperweight, or a knick-knack, or whatever. It makes me smile and giggle in an evil little way.

I was a little giddy about getting started, so I painted the "bomb" before I remembered to get the camera. Then, by that time I had paint all over and I was committed, so I took all of the photos with my phone. Sorry 'bout the quality!

I started with unfinished wood pieces from the craft store. I think the ball is supposed to be for making tiny bun feet (like for a tiny time out tuffet?) It has one flat side, which was perfect for this project since I didn't want it to roll around!

Then I added some paint.

A little distressing ink and sanding so it didn't look so candy-apple red and perky!
Then I dug around in that jar of bits-and-bobs for a nut that was tiny enough.
Slapped on a little E6000 (Amazing stuff! Glues everything. Keep the windows open and your fingers out of the way!!)
Popped in a little snippet of distressed hemp twine.

Finished it off with a little more distressing ink and paint around the nut... and Viola!
I had myself an F Bomb! Makes a great tongue-in-cheek gift for that special someone! Who are you dropping the F Bomb on? Comment and let me know, just don't drop it on me!


I Was Featured at House of Hepworths!

Yesterday was my birthday and I had a wonderful day (a beautiful brunch hosted by my dear sister, a chocolate making class with dear cousin, dinner al fresco... the list goes on...and I will blog about it later)

When I finally climbed into bed to catch up on my favorite blogs and drift off to dreamland, imagine what a birthday treat it was to see my tiny tuffet featured on the front page at House of Hepworths! Can I get a Woot Woot!?

If you are visiting from HOH, thanks for stopping by! My blog is new and I am just getting started. I have lots of projects waiting to be created and posted on, so keep checking in on me!

PS- Your comments bring me so much Sunshine! Thanks for leaving me a note!

July 28, 2011

21 Day Challenge- Day #1

You know those organizing projects that you know you need to do, but keep slipping to the end of your endless to-do list? Sigh. 

For me, having some fun reward or reason to complete said projects always helps. Of course, I know that a clean and organized fill-in-the-blank-here is a reward in itself... but sometimes I need a little kick in the pants.

Then I stumbled across A Bowl Full of Lemons. This girl loves to organize. She has a 21 Day Challenge for home organization and I thought it might be a good way to motivate me. The cool part is that all the people who are participating are taking before/after photos- so you also get inspired by some great ideas and completed projects. Oh, completed projects, you evade me so! 
Anyway, I linked in to join the challenge! Wanna join me? The challenge list goes like this:


21 Day Organizing Challenge

Yep, all the projects you *know* you want to do, but so don't want to do them!

However, I like do to things my own way... so I am starting with Day #7.
What? Me? Break the rules!? I know. I usually am against such horrors!
But I *really* need to clean the pantry!!

So I clicked over to see a few inspirational pantries and suggested steps. Then I cried.
"Step Two. Remove Everything"??

Wouldn't it be easier to procrastinate neater if I just shoved everything around and make
it look tidier? Kept the beautiful waterfall-glass door shut all of the time?

Guess not. This time I will follow the rules. 

The dreaded "Before."
Yep, it is walk-in. And no, you can't walk in it right now. The bags will attack you. Or, 
the cereal perched on top of more cereal will fall and conk you in the head. 
I speak from experience.
Yikes! This angle is even scarier!

Then, the clean out!

Blank slate!
That corner is tricky! It can hide *a lot* of miscellany.

Even the fixture cover came down for a cleaning! 

This little flower... the last of the flotsam from the floor. A sweet gift from Wee-boy.
Then, I scrubbed everything clean, including the wire racks. Supposedly those lovely shelves allow for "breathing" in your spaces. Really, they just allow for everything to fall through. I am not so fond of them. Plus, if you try to slide things to the left or right, things fall over and get caught. 

Since I wanted to put a lot of glass bottles and containers on the top shelf (so I can actually read the labels and know what is in there!) I pulled out some place mats from the kitchen and slapped them down on the shelf tops. Viola! 
No more pouring through the wires! Easy sliding! Plus, since the top shelf will be cooking oils, less worry of dripping! Added bonus: a pop of color and pattern in the pantry!


I didn't have enough for all of the shelves, and they are too big for the less-shallow shelves in the front of the pantry. However, I am thinking some heavy shelf liner might work.

The pantry is clean!! The rest of the kitchen looked like this:


Where did all of this stuff come from!!?? Please, no comments about the amount of artery clogging foods in our house right now. We have house guests and I want them to feel welcome. Okay, we have *one* guest and she doesn't eat junk food. Ah, well.  


Also, notice the pile of dishes in the background. We are big on no dishes left in the sink around here- shows you how eager I was to jump in on this project!! Better get to those next!

Three trips to the compost and recycling bins later...


Ahhh... SO much better. Now, I still have some things to work out and finish. However, I have learned to clean out a space and find out what I really need to store before heading out to buy beautiful baskets and bins. Otherwise, I just end up making three trips: a scouting/buying-too-much trip, a realistic trip, a returning-the-extras trip. 

So now that I have purged and reorganized, I have an idea of which bins, boxes, and baskets I really need want. If you look closely, you'll see that I have used the lids to a few boxes found in the other kitchen cabinets (a whole other post!) My plan is to actually keep those- just spruce them up a bit (read: spray paint!) Also, a Silhouette SD is in my future (can you say Birthday Girl?) and I just know I'll be making the flour bins fancy with some a-mazing labels!! Stay tuned for updates!

So, how is your pantry looking? Post a comment and share your experience! 


PS- My mom says that posting your first time can be confusing if you have never done it before. So here is a quick tip! Scroll down to where you see the little pencil and "Comments: below. Click on "Coments." Read all the great comments left by other readers (thanks Mom and Jocelyn!) Then, Type in your comment into the big comment box. From the drop down menu below that where it says, "Comment As" click and scroll down to "Name/URL". Enter your name. If you have a blog of your own, you can enter your  website in the URL box. No website? No problem, just type in your name to the Name box and leave the URL part empty. Then when your comment posts it will say, "Sally said:" Yay! 

July 27, 2011

Tutorial: Tiny Time Out Tuffet

Last week, post bath and bedtime routine, I gleefully left my family cozy at home to make a run to Ross. I had learned just that day that they are open until 9:30pm- who knew!?

It was a fruitful trip and I returned with all sorts of goodies. While I was there, I saw a tiny stool that looked something like this:


Now I love the idea of this, but not the style. We do use time outs in our house, and since we have a three-year old... the time out spot gets a visiting weekly.  But our time out spot is in the Library/Living Room in our house. So, if I wanted to have a cute spot for time outs, it would need to blend into the decor and not scream TIME OUT!

That's when I spotted this:


Cute, low to the ground, stable. The *perfect* time out spot... just not the perfect color.


So, of course it had to come home with me. I knew that the perfect fabric would find me. Maybe a nice  stripe or quatrefoil pattern?So the little tuffet came home and found a spot on my craft table. Just waiting. 

Fast forward a week. Heading out to Costco this morning, I got there too early and *had* to make a stop  at a close-by fabric store while we waited. Thankfully, I had a partner-in-crime with me (Thanks, Moi!) who was willing to drive the cart around searching for pirate fabric with the wee boy while I wandered the aisles looking for some inspiration. 

I was excited to see that the outdoor fabrics were 50% off! Since I was going to be recovering the little tuffet- an outdoor fabric would be a great choice since it is heavy and durable. And check out what I found:
A beautiful chocolate and sage quatrefoil! 

I could barely contain myself! I was itching to get my fingers on my staple gun! After a few more errands and an amazing lunch at Uwajimaya, it was home for nap and craft time!!

I started by removing the darling little bun feet. 


Then I began prying at the staples. 


Since I was using a thick fabric to recover the stool, I decided to leave the red faux leather on. If you cover your own tuffet (or dining chairs, or some other fab find) you can take the next layer off and start fresh. But, no one will know if you leave it on!


Then it was time to cut the new fabric to size. If I had taken off the red, I could have used it as the pattern. Instead, I just eyeballed it and pretended that I was wrapping a present. 


Then over to the other side, not getting too close to the corners. 


Then, over to the adjacent sides. 

Then it was time to work on the corners. I like a nice flat finish, so I tucked the fabric under and created a nice flat corner. When I did the dining room chair covers, I used a more gathered look. It depends on your preference and the fabric you are working with.

After all four corners were complete, I decided to put the backing fabric back on, so that wee boy wouldn't pick at it the raw edges. 


Lastly, I used an awl to poke holes in the new fabric where the feet went. 


Once the feet were on, it was ready for a time out! 
The best part? It didn't get any use its first night in its new home! 


July 22, 2011

Cheesemaker For A Day

Today was a day to remember! Today I became a Cheesemaker (for a day)!

Those of us in the Seattle area, we know the wonderfulness of Beecher's Handmade Cheese. If you aren't from the Seattle area (or, as of June 20th, from New York City!) I hope you get a chance to indulge in Beecher's delicious cheeses when you come to visit!

Beecher's is located at Pike's Place Market, so it is a sure stop for most tourists and locals alike. Many local grocers and food shops even carry some of the delectable cheeses, so if you aren't in the mood to face the crowds at the Market, you can pick some up during your next midnight run for Oreos cheese.

At Beecher's, they handcraft all of their own artisan cheeses in small batches right in their store front production studio. They use centuries-old methods with only all-natural, farm fresh ingredients. There are large windows facing the street and into the shop, so all the visitors can see the transformation right before their very eyes.

I'm not sure how one becomes a "Cheesemaker for a Day" normally. I happened to win/purchase the adventure at an auction supporting a local school. Since I knew that Moi would be visiting this summer, I scheduled the day to coordinate with her stay.

We arrived at 9:30- after we popped in to La Panier for an almandine and latte- and the cheesemakers were already hard at work. Now I must say that we met quite a few amazing cheesemakers who were all very helpful, knowledgeable, and put up with our and tons of questions and sunshine! And boy do these guys work HARD! I was not quite prepared for the physical labor that we were about to endure!

We started by gearing up with knee-high rubber boots, white coats, aprons, and yep- hairnets!
Then, we were given a full tour of the production facility. The entire place is less than 1000 sq ft, but they are able to create about 4,000 pounds of cheese per day!  Our guide outlined the entire process of creating their signature cheese, Flagship, which was what we were going to make!

There are basically five steps, each one a science in itself. I popped over to the Beecher's site and grabbed a few pics to show you, since we couldn't make cheese and take pics at the same time!

Step One: Fresh Milk
Milk is delivered twice a day, fresh from the farm, just hours after the last cow is milked. All the milk Beecher's uses has no rBST added!
Moo.

This is the milk storage container where the fresh milk is pumped. 

Step Two: Pasteurization
Since the milk is delivered raw from the farm, Beecher's pasteurizes the milk themselves. I was surprised that the milk is only heated for 24 seconds in what they call the HTST process (high temp, short time). The equipment used to pasteurize the milk is a complicated twist and turn of pipes and connections. 
Don't touch! That's hot!
Step Three: Cheesemaking (duh!)
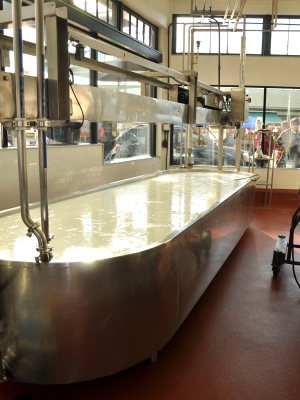
The pasteurized milk gets pumped over to the open Make Vat where the milk is made into cheese. Let's all take a moment to pause and be thankful that someone, somewhere, somehow, once figured out how to make milk turn into cheese. Good thing I wasn't in charge of that invention.  
In this step, a few things are added to the milk. First, enzymes and then the rennet. Beecher's uses microbial rennet. What is rennet? I am glad you asked! Beecher's says, "Rennet is a coagulating enzyme used to curdle milk, causing clumps (curds) to form and separate from the liquid (whey). Rennet is added after the cultures and is also integral to the final flavor of the cheese. Until recently, rennet was derived from the stomach lining of a calf, goat or lamb. Now, many cheesemakers use vegetable rennets (derived from plants) or microbial rennets. In addition to being less expensive than traditional animal rennets, vegetable and microbial rennets allow cheesemakers to craft cheeses suitable for vegetarians. All Beecher's cheeses are made using microbial rennets." Again, who figured this stuff out? 
Next, the curds and whey are pumped from the Make Vat over to the other Open Vat. Here, the whey can be drained out through the large drain down the middle of the Vat. As the whey is separated, the curds begin to 'knit' together. The cheesemakers (hey- that's us!) cut the curds so they can encourage more whey to be squeezed out. 
Step Four: Cheddaring
The name cheddar comes from the process of cheddaring, the next step in cheese making. The curds are cut into 'loaves.' Once the loaves were cut, we had the privilege of stacking, turning, and restacking the loaves. It was amazing to watch the transformation as the enzymes were hard at work, the curds were knitting themselves together, and the whole batch changed texture and shrank as it lost moisture. The loaves are also HEAVY and awkward to handle. The real cheesemakers made it look super easy to flip those babies! We did a lot of laughing at our awkwardness.

This step also includes feeding these large loaves into a chopper of sorts that turns the huge, heavy loads into bite-sized pieces. These bites are salted and mixed up. 
If you visit Beecher's, you can buy the cheese in this stage. They call them "curds" in the shop even though it is past the official curd stage and is really just young cheese! The cheesemaker gave us a few containers to fill when we got to this stage, so we were actually able to bring home the cheese that *we* made!!
Step Five: Hooping and Aging
The salted curds are placed into molds called "hoops." Each hoop holds about 45 pounds of curds. We shoveled and scooped and piled and punched the curds in. At one point the cheesemaker told us to pack the curds in "like they stole your lunch money!" I guess I wasn't punching hard enough! Then we they moved the hoops to a cheese press. The press works overnight to drain more whey and it was crazy to watch the whey pour out from the cheese that was feeling so firm already!  
The Flagship cheese is then aged for a year at an off-site location. There is NO way they could store all that cheese in their shop- remember they make 4,000 pounds of cheese A DAY! Phew! we only made one batch and I was wiped!

Luckily, we were treated to a wonderful lunch at the lunch counter in the shop before we had to turn in our cheesemaker badges. Since we couldn't decided what we wanted off the menu, we decided to each order something different and split. 
Moi picket their world famous Mac and Cheese. It has always been amazing, but after a certain recently-retired television host said it was her favorite, it has really gained popularity. It, of course, is made with their Flagship cheese!
I chose the Flagship sandwich made with Flagship cheese, Just Jack cheese, tomatoes, basil, and Beecher's spread. Delish.

Before we knew it, it was time to hang up our hairnets. What an experience! Thanks, Beecher's! I will never take my cheese- or all the work that goes into it- for granted!