August 27, 2011

Back to School!

Back-to-school time is upon us. In our house, our son isn't old enough for elementary school, but since I am a teacher, it is a special time for me! I have the privilege of working during the school year and having the summers off- and I love the leisurely time that the summer brings. However, each August, the butterflies sneak in and I begin to get excited about school starting again!

This year, I was inspired by some cute back-to-school displays over on Pinterest. So, I decided to create a little arrangement for the kitchen.
I picked out the large scissors from my craft room, a dictionary, and a few books. The little hedgehog just seemed to join the party!
 On the other side, I used my FAVORITE pencils (Ticonderoga) to create a back-to-school vase.

 The book covers were plain paper that I had saved from a shopping trip. It's just the paper that the shop wraps breakables in. I flattened it out, folded it around a book for size, and then used a light blue and red pen to create the "paper" effect. I used my best "teacher writing" to inscribe the cover.
 Before I know it, I will be coming home and collapsing on the couch from a long and exhilarating day of teaching. This little display sure gets me in the mood!

August 24, 2011

Glass, Glass, Baby!

To finish off my list of summer classes (here, here, and here) I recently took a glass blowing class at Uptown Glassworks! I made this:

No, really, I made that! Well, the master glass blower led me through the process and was by my side the entire time, but I made this!

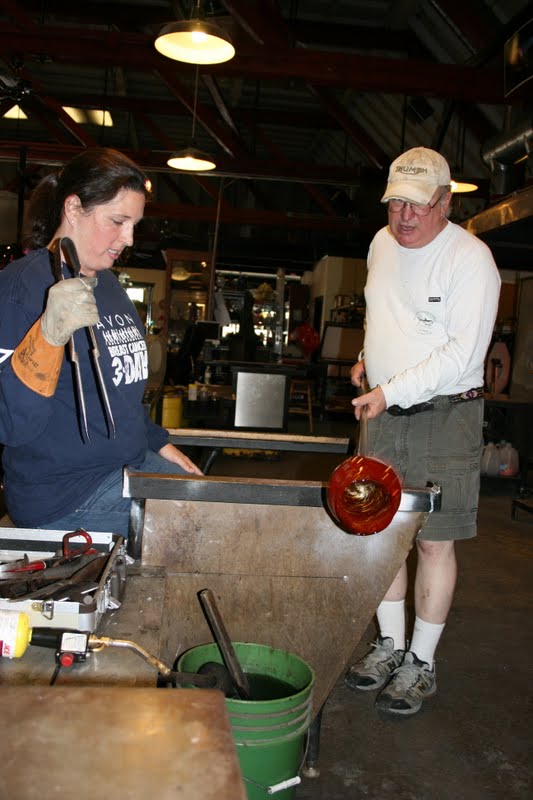
This was, by far, the most intimidating and exhilarating class yet. Mostly because I was constantly in fear of burning a finger or two off! The furnace is kept at a cool 2700 degrees, after all.
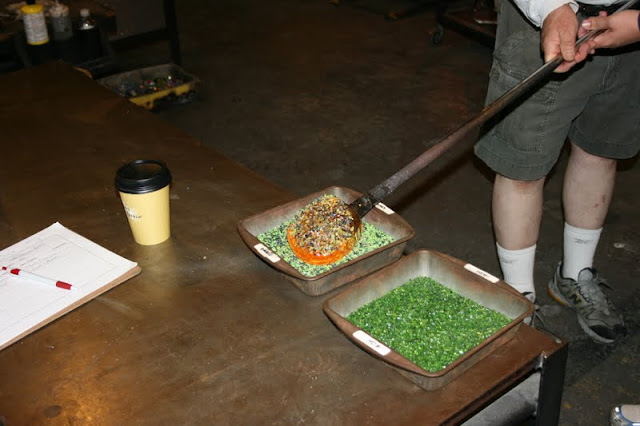
First, I picked the colors I wanted to incorporate into my bowl.
I chose two greens; Grass and Irish.
Starting with a small glob of molten glass, I rolled and rolled to get it nice and smooth and round. 

 It was HOT!
Then we dipped it into the small colored shards. Grass on two sides and Irish on the other two.
Did I mention I was a bit nervous!? 
Then, rolling to swirl the colors.
Back into the fire.
 More rolling and swirling.
 Shaping with a wooden form.


Getting instructions for the "blowing" part of the glass blowing.
 Blowing the bubble. Phew. I had to work hard not to pass out! Not only was that a lot of breath- it was HOT in there!
 Blow, Blow, Blow the glass...

 Ridging the end with a metal jack to make the foot of the bowl.
 Starting to really feel natural at this! Ok, not really.
 Then, my teacher used a blow torch to heat the end even more while I blew to "pop" the balloon. This would make it open to make the bowl.
 I did it!
Then, you have to trim the very thin lip of the bowl so it won't shatter. I let my teacher do the cutting. It was too close for my comfort.

 Using the jack again to open the rim up.
 Finally a spin to get it to open up like a flower.

 It started cooling down quick and you could see the color change from the molten orange to the green that it would become once room temperature.

My teacher pulled a "button" of glass from the furnace for the base of the bowl.
 After setting her down on the button, she was all done!
 I was SO proud!
It had to immediately go into a "cooler" (that was set for 1000 degrees) so it would slowly cool to room temperature and not shatter. I was able to go back the next day and pick it up.

A beautiful addition to our kitchen, don't you think? (House tour to come...)

August 14, 2011

Art Wall

We have a cool little "nook" in the playroom/media room. It is great for all of the storage boxes for the mountain of toys that wee boy has. I wanted to be able to pin up some of his artwork along the wall. I considered using this system from IKEA,
{IKEA}

But it seemed a little too industrial for the warm space. So, I grabbed this beautiful piece of hemlock at the hardware store.
I decided to spray paint it a beautiful blue color called Lagoon. Yes, this is the same color blue that my sister just redid her entire office in, even though I bought it without knowing that! ( Her guest blogger entry to come soon!)

I had just received a package with a whole bunch of styrofoam in it. I thought I would be really clever and use the styrofoam blocks to prop up the wood while I sprayed it. Note: this is NOT what you want to do. Apparently spray paint and stryrofoam don't mix.
Easily fixed, but what a bummer.

Then, I enlisted the help of my trusty sidekick to assist me in measuring out the space for the clips.


I used my trusty tube of E6000 to glue those babies down, and gave them 24 hours to cure.
 I nailed two hangers on the back. Then, using a long level and my favorite new toothpaste trick, I was able to get it up on the wall in no time.
{Via}
I love the way it showcases wee boy's art! Now that my Silhouette SD is here, I will be added some fun vinyl to the space above it. Stay tuned.

August 13, 2011

Chocolate Cabinet

After all my chocolate making, I was trying to find a way to incorporate a little chocolate into my house decor. I found this fabulous French ephemera over at The Graphics Fairy and was immediately drawn to it!
I knew it would be the perfect addition to a small cabinet that was handed down to me from my parents. It has a split-hinged top. I think it was originally a flour bin, but I need to ask my mom to tell me the story again. Isn't she adorable?
She sits in the library next to the tiny time out tuffet.

It has beautiful legs and detailing. When I was little I remember that we used it as side table for our (plaid!) couches. I love the way it smells when you lift open the top. Yeah, I smell my furniture. I am strange like that. 

I started with a light sanding, leaving some of it less sanded in places, keeping its old charm. Then, I propped it up on the tables in my (undecorated) craft room so that I could work on the top without bending too much.

I borrowed an overhead projector from work (yep, we still use these bad boys!) and made a transparency on the commercial photo copier. 
Working with a steady hand, I transfered the image.

Once I had the entire image on the lid, I moved the production out to the garage to lightly sand it. I took the wording down a bit to give it an aged appearance. Then I gave it a few coats of espresso stain.


I finished her with two coats of hand-rubbed polyurethane.


 I love the way it adds interest and a little charm without being overbearing or too country. It is a little chocolate sunshine, if you will.